Monday, January 28, 2013

Chocolate Chip Cream Cheese Cupcakes

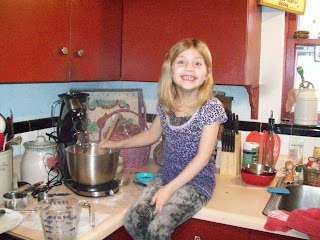
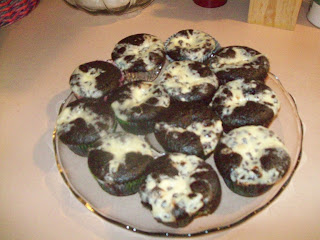
My sweet and adorable cooking assistant and grand-daughter, Riley, helped me make some Chocolate Chip Cream Cheese Cupcakes that we found on Pinterest.  This recipe was pinned from The Capitol Baker.  The first step in these yummy treats is to mix up the batter.  Try not to eat it all, lol.
Next, get your adorable assistant to mix up the chocolate cake:
Once the cake is nice and chocolatey, pour the batter into cupcake liners and put a dollup of filling on top.
Bake them in the oven until they are moist and fantastic -
Here is the actual recipe from The Capitol Baker:

Chocolate Cream Cheese Surprise Cupcakes
adapted from Hershey's
(6 PointsPlus per serving)

Ingedients

for the filling:

8 oz. reduced fat cream cheese, softened
1/3 cup sugar
1 egg
1/8 tsp salt
1 cup mini semi-sweet chocolate chips

for the cupcake:

3 cups all-purpose flour
2 cups sugar
2/3 cup cocoa powder
2 tsp baking soda
1 tsp salt
2 cups water
2/3 cups vegetable oil
2 Tbsp white vinegar
2 tsp vanilla extract

Directions 

Pre-heat the oven to 350 degrees F.  Line muffin cups with paper liners. 

Prepare the filling- beat the cream cheese, sugar, egg and salt in a bowl until smooth and creamy.  Stir in the chocolate chips.

Stir together the flour, sugar, cocoa, baking soda and salt in a large bowl.  Add the water, oil, vinegar and vanilla.  Beat for 3 minutes.  Fill muffin cups 2/3 full with batter. Spoon 1 level Tbsp of the filling into the center of each cupcake. 

Bake 20 to 25 minutes or until toothpick inserted in the cake portion comes out clean.  Let cool for 5 minutes in the pans.  Remove from pans to wire rack.  Cool completely.

These are very good and they make a wonderful presentation for your own family or if you are bringing them to a party.  Let me know if you try them and if you like them as much as we did.


Wednesday, January 23, 2013

Interesting Wooden Box Turned Spice Rack

I went junking the other day and I found this very unique wooden box.  It has an odd shape and random holes drilled in it.  But . . . it had character, so I grabbed it up.

So, I don't know about you, but when I find something unique I think in my head that I don't know where this is going to go, but I know it will have a place some where.  Sometimes it might take me a few days to find the right spot for it.  I have been known to take an item and literally walk around my house with it trying it here and there until the right spot just kind of happens.  I finally decided that the little spot right above my stove was the perfect spot for a little "shelf" to keep my spices in.  When I took my little wooden box into the kitchen and tried it in that spot, it just seemed to fit.

So, now my spices are handy and the little wooden box has found a home.  I'm not sure what it's original purpose was, but it works great as a spice rack!  Do you walk around YOUR house looking for the perfect spot for something?


Tuesday, January 22, 2013

Tool Box Makeover

I love my old wooden tool box, but I felt like it was a little washed out.  I showed you first in this post.
I decided to move it in front of my fireplace and the old weathered pallet board that I have in front of my fireplace is white and the white tool box just kind of washed both pieces out.  So, I decided to paint it a distressed olive which is a color I love and use frequently throughout my home.  I started out by painting it a darker shade of green.
I wanted to give it depth and contrast.  Next, I painted it olive and distressed it a little bit.  I added some pink flowers and now it looks really cute in front of my fireplace.  I need to get a few more flowers though, it needs to be a little fuller.  But, it's definitely working better for me now.

Love it.  Old wooden tool boxes are so popular in blog land and on Pinterest.  Do you have an old tool box?  If so, how do you use it?  Where do you use it?


Monday, January 14, 2013

Old Chippy Window Score!

I found a couple of chunky, chippy, old windows by the curb and had to have them.  I love them.  I have a short little wall in my dining room between my living room and hall that was perfect for them.  Here is what the wall looked like originally.
It was empty and boring.  I have known that I wanted to do SOMEthing for quite a while, but I was waiting for the RIGHT something, ya know?  Well, the windows were definitely IT!  I filled them with photos of my grand-kids mostly.


The number "554" in the top left of the left window represents my 5 children, 5 grand-children and 4 great-grand-children.  The little heart in the bottom right says "family" - both are made from book pages which I also love.

I already have big plans for the bottom half of the wall.  Here's a hint - it involves big chunky wood and chicken wire!  Stay tuned.
Have you fallen in love with old windows?


Wednesday, January 9, 2013

Small Start to Organization

I don't know if you are like me - but January is when I get inspired to get organized and do some cleaning and purging!  The problem for me is always getting started though.  Sometimes, if I start with something real small, it is like dominoes and gets me moving onto bigger and better things.  So ... I started with this little area next to my sofa where I keep random things that I "need".  It started out looking like this:
Not really awful, but not organized AT. ALL.  So, I pulled out a little wooden cigar box that I had.  It is small, but has lots of character.  I love the writing on the sides of it.


And now that little trouble spot looks like this:
Much better.  Now I think I need to tackle those chords in the back!  One little thing can get me started on the next thing and so on and so on.  How about you?  Do you need to start with something little or do you just dive right in to the big stuff?  Any fun boxes, baskets, or organizational tools?


Monday, January 7, 2013

Sugar Scrub & Decorated Jar

If you are a Pinterest fan as so many are, you know how many millions of sugar scrub recipies there are out there.  Well, they make great gifts and I have made a few myself.  This year I made brown sugar vanilla scrub courtesy of Home Made Ginger.  To make it you simply gather and mix together the following ingredients as per her site. 

Equal parts brown sugar and white sugar (ends up being about 1/4 cup each for a 6 oz. jar)
Fill to the top with olive oil (cover the sugars and then maybe an extra 1/2 inch)
Add about 1-2 Tbs of vanilla extract for some yummy flavor.
You could also add essential oils, but that is a little pricier.

Of course, after you have made your sugar scrub, it is always nice to gift it in a fun jar.  Mason jars are great for this, but if you do not have any at hand, any clean jar will do.  I chose a nice sized jar and painted the lid first with primer and then with glossy black spray paint.  I then decorated the top with a cute pink button and some twine, added a tag that I had in my stash and it turned out very sweet.

There was even a tablespoon or so leftover for me!  If you haven't tried one of the sugar scrubs, you definitely should.  Once you do, you will be hooked for sure.  They make your hands super soft and since most of them are scented, that is a nice bonus as well.  I hate having dry hands in the winter and this feels SO pampering.  Make some today, you will thank me later!

How about you?  Have you tried any of the many sugar scrub recipies?  Which one is your favorite?  How about containers, any unusual ones?  I'd love to hear.

Saturday, January 5, 2013

You Are My Sunshine Canvas

A fun and easy project for yourself or to give as a gift, is to use a simple canvas and add your favorite sayings.  I  chose "you are my sunshine" to make for my grand-daughter as a sentimental Christmas gift.  My mother, who passed away a little over 5 years ago, used to sing me this song to me when I was a little girl.  I now sing it to my grand-daughter as a way of connecting her to her great-great-grandma who she doesn't remember.

I started by choosing the colors I wanted to use.  I decided on pink and grey with a yellow sun.  Next, I measured to find the exact middle and then painted the grey on using two coats of craft paint.  I used painter's tape to get a crisp line.  After it was completely dry, I painted on the pink using the same technique.  Next, I free-handed the yellow sun on top.  I bought some silver sparkly letters at Michaels and, using a ruler to keep my lines straight, simply stuck them on the canvas.

A cute and sentimental gift for a cute little girl!
Have you worked with canvas?  Are you a fan of "you are my sunshine" art?  I think it turned out so sweet, I might just make one for myself!