On a recent trip to the Dollar store, I found some vinyl stickers that I thought might make some great signs. I headed to the hardware store to purchase fence posts - they are rustic like pallet wood but without the hastle of all the nails! I had the hardware store cut them for me.
Next, sand and paint them -
Paint a few!
Carefully apply the vinyls - smooth out starting in the middle and working your way outward.
Try some other colors too. For this one, I started with a grey color and then painted white on top to give it a barnwood kind of look.
They look nice and weathered!
Why not do a bunch?
Have you tried using fence boards to make signs? Do you prefer them over pallets like me? I will be posting soon about another project using fence boards!
Tuesday, November 26, 2013
Friday, November 15, 2013
Rice Neck Warmers
It's starting to get a little cold here and my daughter has a birthday coming up, so I decided to make some rice neck warmers. I've been wanting to do this for a while now - like LAST year, lol. Anyway, I researched Pinterest for some ideas and just chose bits and pieces of the ideas that seemed best for me. I started out with a rectangle of scrap fabric.
I didn't really measure per se, just kind of wrapped it around my neck and guessed - it doesn't have to be exact or be any certain size. Again, what works best for you. Then I folded the rectangle in half and sewed two and half sides, leaving an opening at one of the short ends for filling.
Then I gathered my supplies. I used white, long grain rice along with some cinnamon and cloves. I used a 5 pound bag of rice, 2 Tablespoons of cinnamon and 1 teaspoon of ground cloves. Mix this in a bowl.
This made just short of two neck warmers for me. Next, use a funnel and pour into the open end of your fabric. Fill it about half way. You want it to have enough space inside to conform to your neck and shoulders and not be too hard. We are ultimately going for warm and comfy! Then, that's it - just pop it in the microwave for 1.5 to 3 minutes, grab something warm to drink, and snuggle in. It's a simple project that gets a lot of ooohs and aaahhs - plus it smells delicious!
Do you love neck warmers as much as I do? Do you prefer the spicy ones like me or the lavender scented ones?
Monday, November 4, 2013
Rustic House Number Sign
As I mentioned in this post, I have been giving the front of my house a little face lift. I decided to move the house address numbers from beside the front door to over the garage. I had a piece of pallet wood in my collection and it had a wonderful knot in it plus it was the perfect size for this project.
I then dry brushed some rustic red paint (Fireweed by Sherwin Williams) on top so that the house numbers would be more visible.
It turned out pretty well and matches my front door as well -
And here's a shot from the street:
A quick and easy update!
I then dry brushed some rustic red paint (Fireweed by Sherwin Williams) on top so that the house numbers would be more visible.
It turned out pretty well and matches my front door as well -
And here's a shot from the street:
A quick and easy update!
Saturday, November 2, 2013
From Messy to Managed!
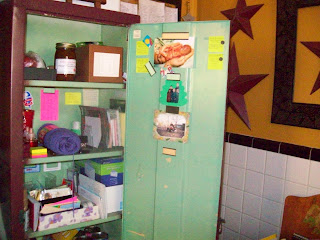
There are a few times of the year that I feel like organizing things. One of them of course is in the Spring for traditional Spring Cleaning. But, I also like organizing right before the holidays - kind of out with the old and in with the new - and also the feeling of starting fresh after the holiday decorations are boxed up and put away. So today, I tacked this little red metal vintage cabinet in my kitchen.
Here's the mess that I started out with -- I hate that I ever let it get this bad.
I know - awful right? So, my stategy was basically to take every single thing out - sort it - then put back only the things that I needed/wanted in this cabinet. Here is the final result:
And the bottom half -
So much better. I will be tweaking it a bit here and there as I go along, but it feels so much lighter. Isn't it amazing how much better organizing a mess can make you feel? And it doesn't even cost any money! Even better.
How about you? Do you just do Sping cleaning or do you have other times of the year that inspire you?
Subscribe to:
Comments (Atom)


